A blog originally for keeping track of my hobby of being a Beekeeper which has evolved to include Home Brewing and even more recently to follow me and my families approach to "The Good Life". Eventually I hope to include baking recipes and stories of our flock of chickens also reporting on the success and failure at the allotments.

Tuesday, 28 June 2011

Apiary inspection 28/06/2011

Today's inspection was an especially good one as my better half came with me. We started off by suiting up and getting the smoker going. Steph took plenty of pictures so will use them to tell the story,

Smoker in one hand, hive tool in the other - Ready!
Bees flying outside th hive entrance.
Hive roof removed, just checking the feeder; they had plenty of syrup left.


Lots of brace comb to be removed before the crown board is replaced.

Loads of Bees! A few puffs of smoke across the top and most will retreat into the hive.


The Bees have drawn out the comb on the left and on the right where it is just foundation still.

A closer look at the comb. Clever Bees.

Plenty of syrup stored and to the left of the comb where they have capped it ready for later.


First frame of brood.
This frame is full of capped brood, eggs and larvae.
Mainly capped brood. In a few days these will hatch into new workers. Also the Queen is in this one!
Carefully placing the frame back.


My better half, Steph, being brave!

Sunday, 26 June 2011

Apiary visit 26/06/2011

Just a quick post to say I went up to check on the hive yesterday. Weather was overcast most of the day but fairly sunny when I went up. There was a bit of activity coming and going from the hive but not as much as last time, probably due to the weather. I removed the roof from the hive and took the feeder off and added 3 litres of sugar syrup, although they hadn't quite finished the last batch. Inside the hive, through the small gap that had the feeder over it, I could see and hear lots of Bees buzzing about. As this was just a visit to check they had enough food I left it at that and put the roof back on and left. I did notice there was a few raspberries ready in the allotment so collected a few handfuls for dessert!

Thursday, 23 June 2011

Beekeeping Course: Week 7

This weeks course was a special one for me as it was the first I had attended as a genuine Beekeeper! Upon arrival we all got talking, mainly about how everyone's Bees were settling in. Mine seem to be doing fine but a couple who attend together who got their Bees the same day as me seem to be very lucky; their Bees have almost drawn out all the foundation into full comb. I imagine mine will catch up without too much problem.

As several people were picking up their Bees and there was a lot to cover we went straight up to the apiary. This weeks course was all about Bee diseases and being able to identify them. As a lot of Bee diseases are first noticeable in the brood as a Beekeeper you need to be able to remove Bees from a frame so you can see into the cells. We split into 3 groups and was shown how to shake the Bees off a comb. Once Ivor had done a frame the hive tool was passed round so everyone had a turn. When it came to my turn I gently removed a frame and had a quick look for the Queen. While I was looking for her I noticed a Queen cup with a white residue on it; I asked Ivor what it was and while he was looking at it a large caterpillar fell of onto the hive below, Ivor quickly caught it and disposed of it. It turned out to be a greater wax moth larva! It was now time to shake the Bees; to do this you hold the frame at either side and then shake with a couple of quick sharp thrusts downwards, which should dislodge enough Bees to be able to see the brood underneath. This should be done to all brood frames at least a couple of times a year if you want to catch diseases before they become a problem. After everybody had shaken a frame we moved straight onto putting the nucleus hives into everyone's hives and then left them to collect at the end.

After a quick break we went straight onto the classroom session which this week was about Bee disease and pests. We were shown several slides with various different problems present. Things we were told to look out for were:-

  • Uneven brood colour; a frame of capped brood should all have a very similar colour, newer comb will be lighter than old comb.
  • Smells; strong or sour odours can be signs of foulbrood
  • Uneven brood pattern; a failing Queen can cause cells to be regularly missed
  • Larva in cells looking different; they should be ivory white and curled in a "C" shape, if they are a different colour or seem twisted in the cell that could be foulbrood
  • Capped cells look sunken; capped brood should be lightly raised, again could be foulbrood
If any of the above are found in the hive then there could be a problem and if in doubt get someone else to look at it. If you suspect foulbrood, either American or European, then by law you need to notify DEFRA; we were all encouraged to register at Beebase and through there you can notify any problems you have. We also mentioned Varroa and Small Hive Beetle. I won't go into much detail on the diseases and pests as they will be eventually added to the separate page I've created .

I also bought a new suit for my better half so she can get a little more involved. She has decided that Bees aren't as bad as she thought but still prefers her chickens, which she blogs about here.
Steph in her Bee suit

Wednesday, 22 June 2011

Apiary inspection 21/06/2011

Yesterday was my first apiary inspection. It was as quick as I could be as I didn't want to disturb the Bees too much. I was unsure how much of the foundation they would have drawn out into comb so I took the frames for the super box with me just in case they needed more room to expand.

Upon arriving at the apiary I got all my equipment out of the car, which included my hive tool, smoker, smoker fuel, wind proof lighter, a couple of frame spacers and a small box for collecting any brace comb that was removed. The smoker fuel I was using was rolled up cardboard which I made sure had no glue or anything on. I put the cardboard into the smoker and using the wind proof lighter got it a blaze then set it down for 5 minutes while I put my suit on.


When suited up I entered the Bee enclosure and puffed a little smoke over the front of the hive and then waited a few minutes to allow the smoke to calm the Bees. The next step was to remove the roof and check on the feeder bucket, which was empty; unfortunately I hadn't brought any more syrup with me so couldn't add any more.  


To access the hive I then used my hive tool to prise the crownboard away from the brood box; I was surprised at how quickly the Bees had glued it all together with propolis. Once inside the hive I puffed a little more smoke over the top to encourage the Bees to go down onto the frames then started taking out the frames to inspect. 

The underside of the crownboard with brace comb. This was scraped off and collected.

Freshly drawn out comb full of sugar syrup
The next comb removed, after the above pictured, had new eggs in but were too small to photo. By seeing eggs it told me I still had a laying Queen. I carefully replaced the frame and continued my inspection. On the 3rd frame with brood on I managed to find the Queen. She is marked with a spot of white paint and visible in the photo below. I have named my first Queen Beeatrix the first!

Can you see the Queen?
When I got to the last frame provided in the nucleus hive I attached a couple of frame spacers as the frames I have are self spacing Hoffman frames compared to normal frames from the nucleus. 

The new frame with spacer added to make it hang far enough away from it's neighbour

When I'd checked the frames I put the back together as quickly as I could. I noticed something in the hive that wasn't supposed to be there.....A wasp!

Wasp feeding from a bit of leaked sugar syrup. I crushed it so it didn't tell it's friends and return!

Saturday, 18 June 2011

Apiary visit 18/06/2011

Today I visited the apiary to see how my Bees were settling in to their new home. Before going I made up some syrup to feed them; this is done to help the Bees get off to as best start as possible meaning they can concentrate on building wax comb rather than foraging. The syrup was a 1:1 ratio which means 1kg of sugar to 1 litre of water, but today I made 2:2 which made just over 3 litres.

The 3 litre pop bottle was full to the brim with syrup and I still had to take a small container to take the rest!
When I got to the allotment I put my suit on and headed to the apiary. My Dad called me earlier to say he had been up there today and put a door on the apiary at the back making it easier to get in and out.

The newly fitted door at the rear of the apiary and the back of the hive
Once inside the apiary I took the roof off the hive and lifted the feeder out. It was a good job I went up today as the feeder was almost empty! I poured all the syrup into the feeder and after taking a couple of pictures put it back in place. Although I didn't open the full hive up, it was good to see a small bit of the inside when I lifted the feeder. I could see the Bees have been busy and are building new comb, they had even built some on the bottom of the feeder!

The lid of the feeder with wax comb built on

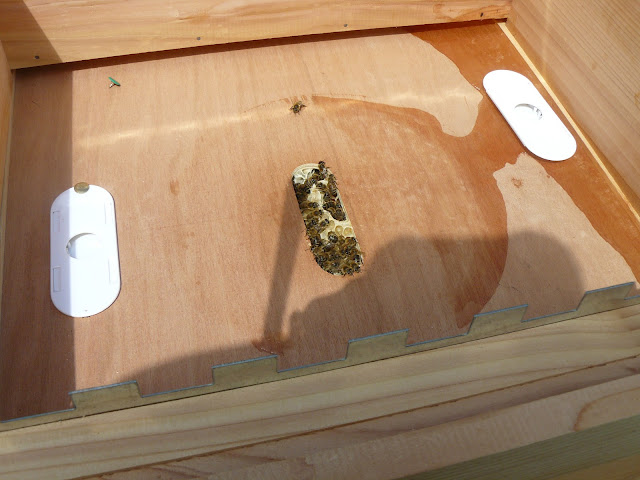
Inside the roof where the feeder has been. The 2 white things are porter Bee escapes

A close up of the opening. Sorry it's slightly out of focus, it's hard to take pictures with a veil and gloves on!
I will be going back to do a full inspection some point next week and see how they are developing inside the hive!

Homebrewing Gifts from Grandad... Part 2

After visiting my Grandad the other day I am now the owner of another 3 demijohns! Unlike the other brewing vessels I acquired from him these were full of wine he made 25+ years ago! He isn't totally sure what flavour each one is but believes they are parsnip, sloe berry and elderberry. I'm not sure if they will all be any good but I have already siphoned one demijohn off into bottles and started drinking it. The other 2 have a lot of sediment in the bottom and smell slightly musty when I have taken the tops off for a quick sniff so may end up down the drain!

Syphoning the contents of the demijohn into a empty clean wine bottle
A close up of the contents
Due to there been a lot of sediment I decided to use 2 filters.
The finished product
In total I bottled 5 full 750ml bottles and nearly filled a 6th. I couldn't tell what was used to make this wine but it tasted good to my unrefined palate. I also have no idea of how strong it was however after 2 large glasses I could tell I'd had it!

Friday, 17 June 2011

Beekeeping Course: Week 6 ..... Bee Day

Wednesday the 15th of June will be now known to me as Bee Day. At last I can actually call myself a Beekeeper! The day started with me going to work at an early hour then when I got home I prepared my hive to take along with me to the course. While doing this the heavens opened and we had a really strong downpour. At this point I expected that any apiary visit would be out of the question but luckily I was wrong.

Upon arrival at the course Ivor advised us that anyone who had brought a hive would be able to take their Bees home after the class, as he had created enough nucleus hives for everyone who required one. There were three of us this week, including myself with hives. I drove my car up to the apiary and we split into three groups; one for each of us who were taking Bees that night. The first thing that was done was to put my hive where the nucleus hive was, and move the nucleus box to the side; that way any Bees that were out foraging would return to my hive rather than the nucleus hive. Ivor then removed the 6 frames within the nucleus hive and placed then into my hive along with 5 frames of wax foundation that I brought with me in the hive. It was at this point that one of my new "ladies" was a little too affectionate with her greeting and stung me on the ankle. I know it was a lady bee as males can't sting! It felt a little like a hot needle in my skin, luckily only for about half an hour before it wore off. Ivor found the Queen and marked her with white paint while he was transferring the frames over to my hive. We then left the apiary and headed into the classroom with the hives open ready to collect any stray Bees.

Upon returning to the classroom we had a quick coffee break and then moved on to discussing swarm management. One of techniques covered was the "artificial swarm"; this method is used when Queen cells are found and is a way of controlling the swarm before it leaves the hive. With this method you need to have a second hive. The first step is to move your hive about 2 foot to one side and put the second hive in it's place. You then take out the frame with the queen on and place this into the second hive and fill the hive with frames with drawn out comb or foundation if comb is unavailable. This frame with the queen on must have any queen cells removed so they aren't raised into a new queen that may fight with the old queen. In the second hive you need to get rid of any sealed queen cells but leave the unsealed ones. At this point the hives are sealed back up and left for a week. During this time the flying Bees from the first hive will have returned to the location of the first hive, which is now the second hive and the one with the old queen in. The Bees in the hive with the old queen now have plenty of room to expand and are much less likely to swarm. After a week you can go into the hive without a queen and remove all but one queen cell, which should be sealed by now and depleted of Bees as most have returned to the location of the original Queen. This hive is now moved 2 foot to the other side of the hive with the old Queen causing even more flying bees to return to old Queen as they will seek the nearest hive when they find their hive has been moved. At this point you will have a strong hive with the original Queen and a smaller colony with a newly raised Queen. You now have the option of amalgamating the 2 hives but with a younger Queen or having a second hive. This method does sound complicated on paper but when it was demonstrated at the course it was much easier to get to grips with. There were other methods that were explained but I will leave them for the time being.

At the end of the course I returned to the apiary to collect my Bees. I closed the entrance up and placed the Bees carefully into the back of my car. When I started the car there was a steady buzzing coming from the back that seemed to be getting louder. When I looked in the mirror I noticed that several Bees had either escaped or were on the bottom of the hive when I picked it up. I decided it would be a good idea to wear my suit while transporting the Bees. It was a interesting drive to my apiary at my Dad's allotment but I managed it without further incident. When I got to the allotment and met up with my Dad I carried the hive to it's enclosure that me and Dad built over the last few days (mainly my Dad). We then made up a mixture of syrup in my plastic feeder to feed the Bees made of 1kg or sugar to 1 litre of water and placed it in the hive. When I opened the entrance to the hive I expected them to all fly out angrily looking for who had moved them unwillingly to this new location but was surprised when none did. Probably because it was late by then and light was fading.

The following day (Thursday) after work me and my partner went up to the apiary, dropping the baby off at her aunts on the way. We only had a quick apiary visit and didn't use the suit. My better half even ventured into the Bee enclosure and she isn't the biggest fan of Bees. Thankfully the Bees were very well Bee-haved and Steph's opinion of my girls has been raised. She actually rather enjoyed it and would like to come more often.

This is a old door that the hive sits on allowing air to flow under providing ventilation

One of my ladies doing guard duty

Me stood next to the hive proving how brave I am

The apiary enclosure that me and Dad built (mainly Dad)

Just to the right of the apiary is the fruit trees that my girls will be pollinating next year


Sunday, 12 June 2011

Wakefield and Pontefract Beekeepers: Summer Apiary Visit

Yesterday was the third Summer apiary meeting, but only the first I have managed to attend due to work commitments. It started at 3pm, but I arrived a little early. It was held at Judy's house; she is a member of WPBKA. As we waited for everyone to arrive, I was chatting to a few other members. One thing I seem to be asked regularly is "how are your bees?". Unfortunately they don't exist yet, which is a shame for a Beekeeper! Hopefully, the next time I am asked that question I will have a better answer! Fingers crossed.

When everyone arrived, we suited up and headed off for the apiary, which was a bit of an adventure. We walked to the back of the garden, through an orchard and past the vegetable plot and into dense trees. After that we made our way through a patch of ferns, then up a path to the concealed apiary which was in a clearing in another patch of woodland. It must have looked strange to the group of kids that were playing in the area, as 20 ish fully suited Beekeepers walked past.

When we got to the apiary we all gathered around the first hive which is one I've not seen before called a Dartington Long Deep Hive but this one is unoccupied at the moment. This, to me, seemed like a cross between a Top Bar Hive and a British National Hive; to access the brood you lift the lid and then all the frames are in one long row like a TBH but they are made from frames with wax foundation like a British National. Due to the length of the hive it is possible to split it into 2 hives when the Bees are wanting to swarm. The supers in this hive are half the size of standard supers, therefore half the weight, which is why Judy is trying this design.


The next hive was a British National Hive that had a frame of wireless foundation in one of the brood frames to encourage the Bees to make queen cells. The method they were using was a little complex for me at the moment and I won't try to fully explain it but will mention the basics. To start with you use half a sheet of wireless foundation put into a full size brood frame; when the Bees have made the foundation into cells and the queen has filled it with eggs the next step was to move it into a nuc hive without the queen. This will make the Bees left on the frame make queen cells by feeding the young larva royal jelly. Then the queen cells can be cut from the frame and placed in to queen-less hives to save them. That's basically how the method was done. This method would be easier described with photos so if I try this in the future I'll take some. Unfortunately reading the description I've just written makes it sound more complex than it actually was!


The third hive we looked at was again a British National and again involved a process that I will make sound complex when I try to explain! When the hive was opened up there were queen cells found at different stages of development; one was capped and the others weren't. The queen was also found in this hive along with a large amount of Bees. Due to all these factors it was decided that there could be a possibility the hive was ready to swarm. To try to stop the hive swarming a nucleus hive was taken out of this hive. The frame with the capped queen cell and also the frame with the uncapped cells were removed and put into the nucleus hive. The capped queen cell was removed; this is done to stop the Bees creating a mini swarm or cast swarm. The uncapped queen cells were left; they are left because you know that by the time the queen cell has been capped and the queen has developed, then finally hatched there will be no more eggs left so the queen will stay and hopefully start laying. Also placed in the nucleus hive were a couple of frames of food. With this nucleus hive removed from the main hive there is now more room in the main hive so their urge to swarm will be lessened. Also if there is a problem with the original queen then there is a spare in the nucleus hive.


After the apiary visit we returned to the house and had refreshments. Judy had made lots of sandwiches and other snacks including home made cakes. It was good to sit and relax with cake and a cup of tea after all the complex hive manipulation that had been going on! I got talking to a few of the more experienced Beekeepers and a couple of people who were still on their first hive. All in all it was a good day and I was surprised that it lasted 3 hours as it seemed to pass so quickly. I look forward to trying some of the techniques seen at the apiary. I will include my own pictures where possible to try to make things make more sense!


Thursday, 9 June 2011

Beekeeping Course: Week 5

This Wednesday was the first lesson back after half term. As I am working night shift this week I had a lie in on the morning, however I was woken up by such a large noise outside as the heavens opened and hail stones came down hard for 15 minutes followed by a heavy thunderstorm. Though this was impressive to watch (and amusing watching our 3 chickens running around in the rain getting wet) it also made me think there would be no apiary visit on the course this week; I was wrong! After 20 minutes of heavy rain it stopped as quickly as it started and the sun came out for the rest of the day.

When I got to the classroom we all suited up and made our way over to the apiary. We split into 3 groups and checked the hives. After having some really nice warm weather over the last 2 weeks we were hoping to see eggs laid by the new queens. Last time there were a couple of hives that had virgin queens that hadn't mated yet, they need a couple of warm days to allow them to get out of the hive to mate; the first hive opened was one of them and there were eggs present. A further inspection of that hive in a weeks time will hopefully reveal that she is laying worker eggs and not just drone eggs. If she is just laying drones (males) then the colony is doomed as it can't survive without workers (females) to collect food and look after the young. We didn't see the queen in there but as she is a new queen she wouldn't look too different from a worker as her abdomen wouldn't have got enlarged yet. We then moved onto the second hive which is an established colony and did a check of that. In this hive we got the chance to do the inspection ourselves so when it came to my turn, using the hive tool, I separated the frames of brood and carefully lifted the frames one by one. I was unable to find the queen but did find brood in all the frames I checked. While we were doing this the teacher with one of the other groups shouted over to say they had a drone laying queen. Unfortunately she will have to be killed and replaced if the colony is to survive but as she couldn't be found then it'll have to be done another time.

After a short break for tea and coffee we had a sort of test where we were given nine bits of paper with images of the 3 castes of bees (queen, worker and drone) but they were cut up separating the head, thorax and abdomen. We had to put the bits together to correctly identify the 3 castes. We finished this fairly quickly and moved onto the next part which was talking about the different castes and comparing how long each takes to develop from egg to bee; this is a link to wiki site that shows the times if interested. This is important to know as it helps with swarm control. Next weeks course includes swarm management so I won't go into that this week.

I have saved the most important part of this weeks course while last. During the apiary visit Ivor said that he does have a few nucleus hives ready for us and hopefully will be able to collect mine next Wednesday! This means I need to pull my finger out and get to my Dad's allotment during the week and prepare the site. I must admit that I am buzzing with excitement at the thought of finally being able to say I'm a Beekeeper!

Friday, 3 June 2011

Bumble Bees in my Garden

As it is half term this week there is no Beeekeeping course so as it's been really nice weather over the past couple of days I've been out and about in my garden and noticed there was a high number of Bumblebees about. My foxgloves and lupins seemed to be the main attraction for the Bees along with the occasional dandelion, however these have now been removed when the lawn was mowed. The following movie is of a Bumble been really busy collecting nectar or pollen from my foxgloves.


Also below is a few photos of a different Bumble among my lupins at the other side of my garden.